
Field Types (not published)
When adding new fields, choosing the correct field type is critical in unlocking your application's full functionality. For instance, using Date Formula Field in the Equations category will allow you to filter your data with complex date formulas and calendar component functionality whereas a number field type will not. Similarly, choosing an email field type rather a text field type for an email address field is critical in unlocking powerful email functionality, such as sending automated emails from your app.
Tadabase offers a variety of field types to accommodate nearly any type of data type you would like to store. The Add Field Menu located on top of each data table divides all fields into seven field type categories:

Let's explore each field type category as well as each field type in detail.
Number Fields
The number field types consists of the 5 fields pictured below. These fields can be useful for keeping track of number amounts, scoring and selecting number values.

Number
Number Fields are the most basic form of number type fields.


- The Name for your number field will help define what this value represents.
- Descriptions can be a good tool to keep track of further information to describe the field.
- Decimal Place values can be configured to show the specified number of digits after the decimal in your fields.
- The Thousands Delimiter can be configured to show the specified symbol to separate groups of thousands.
- You may define whether the value of this field must be Unique per the records in this table.
- A Placeholder can be configured to show text in a form field without populating the field with a value. Placeholders are only visible when no text is entered in the field.
- The Default Form Value can be configured as well. Unlike Placeholders, this value can be set by default to submit on a form. For the Number field, only digits can be set for this value.
Decimal Places can be configured to show up to 10 digits.

If None or 0 is selected, only whole digits will appear in your table components. It is important to note that if a decimal value is submitted on a form for a Number field configured this way, rounding will not occur and the digits after the decimal place will not be stored.
However, if one or more Decimal Places is configured, all the digits after the decimal place will be stored but will be rounded to the configured decimal place.
For example, let's say that we have Decimal Places configured to 1 and the following value is entered into a form.

With the current configuration, the value appears rounded to the nearest 1 decimal place.

If the Number field is updated so that Decimal Places is now 2, the value will no longer rounded.
The original value submitted on the form will appear on table components.

The Thousands Delimiter determines what symbol separates groups of thousands when viewing the values. This setting does not affect how the values appear in forms. There are currently 4 options as follows:

By default, None is configured. Numbers will appear as-is with this setting.

Pictured below are samples of the non-default configurations in the same order as listed above.
Comma

Period

Space

Currency
Currency Fields are a variation of number fields designed to store monetary values.


- The Name for your currency field will help define what this value represents.
- Descriptions can be a good tool to keep track of further information to describe the field.
- The Currency Type can be selected based on the type of currency that you need to store.
- The Format determines the location of the currency symbol in components.
- Decimal Place values can be configured to show the specified number of digits after the decimal in your fields.
- The Thousands Delimiter can be configured to show the specified symbol to separate groups of thousands.
- A Placeholder can be configured to show text in a form field without populating the field with a value. Placeholders are only visible when no text is entered in the field.
- The Default Form Value can be configured as well. Unlike Placeholders, this value can be set by default to submit on a form. For the Currency field, only digits can be set for this value.
Currency Types are selectable from a dropdown list. If we are missing your currency, please choose "Custom" and enter your own currency symbol.
- AED - United Arab Emirates Dirham - د.إ
- AUD - Australian Dollar - $
- BGN - Bulgarian Lev - Лв
- CAD - Canadian Dollar - $
- CHF - Swiss Franc - Fr.
- EUR - Euro - €
- GBP - Pound Sterling - £
- GHS - Ghanaian Cedi - GH₵
- GTQ - Guatemalan Quetzal - Q
- HRK - Croatian Kuna - kn
- IDR - Indonesian Rupiah - Rp
- ILS - Israeli New Shekel - ₪
- INR - Indian Rupee - ₹
- JPY - Japanese Yen - ¥
- MUR - Mauritian Rupee - ₨
- NZD - New Zealand Dollar - $
- PGK - Papua New Guinean Kina - K
- RSD - Serbian Dinar - дин
- SAR - Saudi Riyal - ر.س
- TRY - Turkish Lira - ₺
- USD - US Dollar - $
- ZAR - South African Rand - R
The Format setting has 3 different options. The default is Prefix.

Pictured below are some screenshots of forms and table components illustrating the visual difference of the various Format options.
None

Suffix

Prefix

For more information regarding the Decimal Places and Thousands Delimiter settings, please see the Number field above.
Auto Increment
Auto Increment Fields are automatically generated numeric values that increment by 1 for each new record. This field can be used to create a numeric ID for your records.


- The Name for your numeric field will help define what this value represents.
- Descriptions can be a good tool to keep track of further information to describe the field.
- The number in which your incrementation will be Starting At can be set to create values starting at a certain number of digits.
Below is a simple example of products and IDs where the new entry has an ID incremented by 1 from the last product added to the table.

Rating
Rating Fields are where you can add a score or a review to your data tables.


- Adding a Name for your text field will help define what this value represents.
- The Description can be a good tool to keep track of further information to describe the field.
- You can select the maximum rating with the Number of Stars selector.
- Enable Reset
- You can customize what your rating icon is in Default Icon. You can choose between stars, hearts, thumbs up, flags, or select a custom icon.
- In Default Icon color you can customize this icon even further by adding a color to it.
The Number of Stars setting has 4 different options. The default is 5.

Pictured below are some screenshots of forms and table components illustrating the visual difference of the various Number of Stars options.
3 Stars

4 Stars

5 Stars

10 Stars

In Default Icon and Default Icon Color you can choose a default icon and customize the color. Here I chose red hearts.

You can also open the Custom selector, click Select Icon and type in a specific image in the Search bar. Here I searched for apples as a unique way to possibly rate a teacher.

Slider
Slider Fields allow you to add a component to your page builder that have 2 defined numbers and a sliding bar to choose between the numbers.


- Adding a Name for your text field will help define what this value represents.
- The Description can be a good tool to keep track of further information to describe the field.
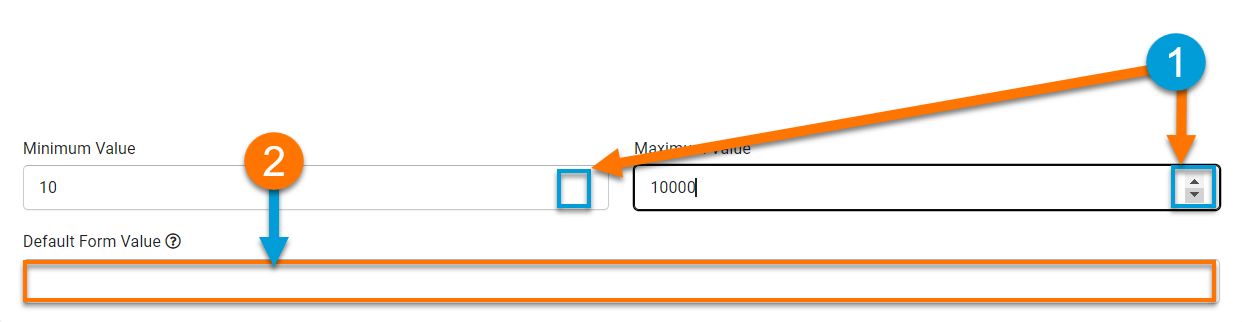
- You can set a Minimum Value to define what value your slider should start at.
- The Maximum Value selector defines the end point of your slider
- The Value when the form loads is set by the Default Form Value.
Minimum Value and Maximum Value is where you define the starting and ending point of your slider. You can type in a number or click the pointers found in the blue box on the side to go up or down as seen in #1. Underneath in #2 is where you would set a Default Form Value point in your sliding bar. You can have it default at your minimum number, maximum, or anywhere in between.
Date Fields
Consist of the 4 fields pictured below. These fields can be used for many purposes such as tracking changes in your records.

Date
Date Fields hold values that represent a specified month, day, and year.


- The Name for your date field will help define what this value represents.
- Descriptions can be a good tool to keep track of further information to describe the field.
- The Default Form Value can be set to automatically populate forms where this field appears.
Below, you can find an example of a Date Field in a form with the Default Form Value set to January, 14th, 2022. In this example, you'll see our date selector for forms, and how the Default Form Value sets the value upon form submission as well.

If you would like your Date Fields to appear in a different format, you may do this in the General Settings in your app settings.

Time
Time Fields store values that represent a specified hour and minute of a day. Depending on how your app's time format settings are configured, the value will store AM/PM period will also be stored appropriately.


- The Name for your time field will help define what this value represents.
- Descriptions can be a good tool to keep track of further information to describe the field.
- The Default Form Value can be set to automatically populate forms where this field appears.
Below, you can find an example of a Time Field in a form with the Default Form Value set to 12:00 PM. In this example, you can observe our time selector for forms and how the Default Form Value resets the value upon form submission.

If you would like your Time Fields to appear in a different format, you may do this in the General Settings in your app settings.
Date & Time
Date/Time Fields store values that represent a specific date (day, month, year) and time (hour, minute, AM/PM when applicable).


- The Name for your date/time field will help define what this value represents.
- Descriptions can be a good tool to keep track of further information to describe the field.
- The Default Form Value can be set to automatically populate forms where this field appears.
Below, you can find an example of a Date/Time Field in a form with the Default Form Value set to October 01, 2019, at 12:00 PM. In this example, you can observe our time selector for forms and how the Default Form Value resets the value upon form submission.
If you would like your Date/Time Fields to appear in a different format, you may do this in the General Settings in your app settings.
Date Range
Date Range (Calendar) Fields are fields that enable you to set a duration of time with a start and end value. The start and end values, similar to Date/Time Fields, hold a date, hour, and minute value.


- The Name for your date range field will help define what this value represents.
- Descriptions can be a good tool to keep track of further information to describe the field.
- Select how you would like the End Date/Time Format. This affects how the field behaves in a form. See below for more information about the available formatting options.
Below are some examples showing the Date Range Field in forms and tables. Each example shows a different configuration for the End Date/Time Format portion of the field. The start value will always be a date and time value. The end value will appear in your forms using your chosen End Date/Time Format configuration. In all instances, the record value in the table appears as two date and time values representing the start and end of your date range.
End Date/Time Format Set to Date Field

This configuration prompts for a date and time to be selected for the end value.
 End Date/Time Format Set to Time Field
 This configuration prompts for a time to be selected for the end value. Note that it will always use the same date for the end value.

End Date/Time Format Set to Duration Field

This configuration prompts for a duration of time in minutes, hours, or days to be selected where the end value is calculated upon submission.

Equation Fields
Basic Formula
Basic Formula Fields are fields with automatically generated values based on a defined formula. These fields can reference other numeric values in their formula.


- The Name for your currency field will help define what this value represents.
- Descriptions can be a good tool to keep track of further information to describe the field.
- The Formula for the field must be defined for the value to be generated upon record creation/edit. Read ahead for further information on the Formula portion of this field.
- The Currency Type can be selected based on the type of currency that you need to store.
- The Format determines the location of the currency symbol in components.
- Decimal Place values can be configured to show the specified number of digits after the decimal in your fields.
- The Thousands Delimiter can be configured to show the specified symbol to separate groups of thousands.
The Formula portion of the Basic Formula Field can be broken down into 3 key components as follows:

- Add the numeric value from a field in your record, an operation, or a custom numeric value.
- Reorder or Delete components
- Preview your equation.
To show a simple example of how this field can be used, let's walk through how you can create a Basic Formula Field that calculates the average of two numbers.

We have a fairly simple table with 3 essential fields, Value 1, Value 2, and Basic Formula. Value 1 and Value 2 hold the two numbers for the calculation, and Basic Formula will store the calculated average. The field named Formula is used to create the "Average of.." statement seen in the image above. If you would like to learn more about how you can do this, please see our article on Text Formula Fields.

Now we can configure the Formula. In the gif below, you can see how we can use the functionality of the Formula portion to configure the average formula for our example.
Below is the resulting Formula.

To test out our Formula, we'll create a simple form with Value 1 and Value 2.

Lastly, we can confirm our results!
Nesting Basic Formulas
Please keep in mind, basic formulas can not be added inside other basic formulas. If you need to reference another basic formula you can add that formula inside () of this formula to force it to run first.
For more information regarding Currency Type and Format, please see the currency section.
For more information regarding the Decimal Places, please see the Number Field section.
Complex formula fields consist of:
-
Count
-
Maximum
-
Minimum
-
Average
-
Sum
Count only work with connected records. We’ll use an example to understand each use case. In our example we have Customers and Jobs. Each job is assigned to a specific customer.
In this example you can see that our Count field goes up by 1 each time a new job is added:

Maximum
.png)
Minimum

Sum
In our next example, let’s add up the total cost of each job for our customer. As you can see John Simmonds has 3 jobs each with a unique cost. From the customer we can summarize all the jobs and update the Total Cost field.

Equation Fields enable more complex formula functions to be run on your values. These fields can be used in combination with Formula Fields and can be nested with other Equation Fields.


- The Name for your text field will help define what this value represents.
- Descriptions can be a good tool to keep track of further information to describe the field.
- The Equation is where the function to perform is defined. Read ahead for further information on this portion of the field.
- The Output Type is the field type of the resulting value of the equation.
To start, let's take a look at the Equation portion of this field. First, we are going to take a look at the following two components:

- The Add Field dropdown list is where you are able to select from all of the fields that are available for reference in your Equation.
- The Equation Editor is the text box. This is where you will add and edit fields and functions in your equation.
Let's take a closer look at the Equation Editor. There are a few very important factors regarding this portion of the field configurations that are consistent across all functions.
When a field is added through the Add Field dropdown, the field name will appear in the Equation Editor within braces. It is important to note that the field name must match the name of your field in your table exactly, and the braces must be around the field name.
There are three types of functions as we will define in the next portion of this article. If you select any of these functions, it will appear in the format of FunctionName(). For example, let's take a look at the ABS function.

The portion left of the parentheses is going to be the Function Name. This must exist with no characters in between its corresponding parentheses. Inside the parentheses is where you will place your input field(s). Depending on the function, you may have more than one field referenced, however, regardless of the function, your fields to be processed will need to be between the corresponding parentheses.
Below is an example of what a valid Equation looks like where we are performing the function on one field. We will go through each Equation type in this article so please read ahead if you are looking for further information on a specific type.

The Equation portion of this field is very powerful with functions that have a wide range of uses. We'll discuss each type of function separately as labeled below.

A. Math Function - For comprehensive list and more examples of using math functions please click here.
B. Text Function -For comprehensive list and more examples of using math functions please click here.
C. Date Function -For comprehensive list and more examples of using math functions please click here.
D. Other Function - For conditional equations using an IF statement see this section. Click Here
Date Formula
Date Formula Fields are fields with automatically generated values based on a defined formula. These fields can reference other date type values in their formula.


- The Name for your date formula field will help define what this value represents.
- Descriptions can be a good tool to keep track of further information to describe the field.
- The Display Output must be defined for the value to be generated upon record creation/edit. Read ahead for further information on this portion of this field.
- The Formula Selector section can be broken down into categories as seen below.

- Select the format for the values of your field.
- Add the date type value from a field in your record, an operation, or a custom value.
- Reorder or Delete components
- Preview your formula.
Let's take a look at an example of the difference between two Date/Time Fields showing results in the formats for Day, Hour, and Second. We'll show an additional example for the Date format as well.
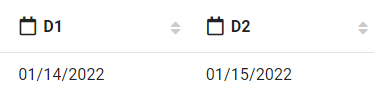
For the first three formats, we'll use the following formula where D1 and D2 are Date/Time Fields.
These are the values that we have set for D1 and D2.
With the same formula configured for each, we have three results showing the different formats Day, Hour, and Second. For the Hour format, you are able to select from options to show minutes and seconds as well.


For our second example showing the Date format, we'll create a new formula utilizing a custom value. When adding a custom value, you may define the value or utilize a numeric field. Additionally, you may define the format representing the increment of time that is to be used for the custom value. In this case, we will define the numeric value and use the Day format.
With the same value for D1 as defined in our previous example, we have the following result.

With a form and a table component on a page for our example, we can observe the Date Formula values are populated automatically.

Option Fields
The options field types consist of the 5 fields pictured below. These fields consist of a list of selections that can be configured in various ways.

- Checkbox
- Radio
- Select
- Multi-Select
- Decision Box
File and Image Fields
Consists of the 2 fields pictured below. These are both designed to hold uploaded files.

- File
- Attachment
File
The file field allows you to upload files and store them on Tadabase or your own servers. When using AWS S3 either on Tadabase or your own server you can choose for files to be secured.
Setting the file to secure will not allow the file to be downloaded unless it's being downloaded from within a data component or the builder.
Although you can see the link, when trying to access this file it will return an authorization error.
Connection Fields
Consist of only the Connection field.

Field Limitations
-
Field limitations are restricted to no more than X KB per row. (more on this later)
-
You can only change a field to similar category field type
-
Field names per table must be unique
-
Changing field names will not impact the names used in the app
Fields that are used to display dynamic content such as equations are read only and have some limitations including:
-
Can’t add to form
-
Can’t utilize record rules to update its value
-
Can’t be imported into and therefore can’t be mapped in import templates.